Drawing from a Grid: Major Graphite Value Drawing: Fears or Dreams

The grid method is an inexpensive,
low-tech way to reproduce and/or enlarge an image that you want to draw. While
the process is not as quick it does have the added benefit of helping to improve
your drawing and observational skills.
In a nutshell, the grid method involves drawing a
grid over your reference photo, and then drawing a grid of equal ratio on
your work surface. Then you draw the image on your paper, focusing on one
square at a time, until the entire image has been transferred. Once you're
finished, you simply erase or draw over the grid lines, and add value.
Materials needed:
Ruler
paper copy of your reference image
pencil
***Be
sure to draw the grid very lightly, so that you can easily erase it when you
are finished.
The important thing to remember when drawing the
grids is that they must have a 1:1 ratio. This is
very important - otherwise your drawing will be distorted!
Confused? It's quite easy once you get the hang of
it. Let's see the grid method in action, and it will make more sense.
Let's say you want to draw the following image:

This
reference photo is 5" x 7".If you want to make a 5" x 7" drawing
from this photo, drawing the grid will be pretty straightforward. But if you
want to make a larger drawing, you could also make a painting that is 10"
x 14"or 15" x 21" or 20" x
28". Why those sizes and not other sizes? Because those sizes are the
same ratio as the 5" x 7" reference photo. In other words:

To draw the grid:

Each square is 1 square inch. To draw this grid,
put your ruler at the top of the paper, and make a small mark at every inch.
Place the ruler at the bottom of the paper and do the same thing. Then use the
ruler to make a straight line connecting each dot at the bottom with its
partner at the top.

For your drawing: place the ruler on the left side
of your paper and make a small mark at every inch. Then place the ruler on the
right side of the paper and do the same thing. Then, using your ruler, make a
straight line connecting the dots on the left with their partners on the right.
You've now got a grid on your work surface that perfectly matches the grid of
your reference photo. Bravo!
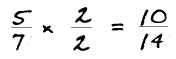
Because this painting will
be the exact size as the reference photo, the squares on this paper are also 1
square inch. If this painting was going to be 10" x 14", then the
squares would need to be 2 square inches, because:
See?
 Basically,
to enlarge the image, you'll need to do this kind of math (even if you hate
math!). It's necessary in order to make sure the enlargement is exactly
proportionate to the original. If you're not sure whether you've done the math
correctly, just count the number of squares in each row and in each column, and
ask yourself:
Basically,
to enlarge the image, you'll need to do this kind of math (even if you hate
math!). It's necessary in order to make sure the enlargement is exactly
proportionate to the original. If you're not sure whether you've done the math
correctly, just count the number of squares in each row and in each column, and
ask yourself:
·
Are there an equal number of rows and columns on the canvas as there are
on the reference photo?

·
Are
the squares on the good paper perfect squares, just like the
squares on the reference photo?
If you are planning to
enlarge your reference photo to create a bigger drawing, please remember to
keep the proportions correct. Make sure that everything is equal. For instance,
if your photo is 8" x 10", then you can easily create a drawing in these
sizes:

 These
sizes work because they are all equal to 8" x 10". Basically, if you
multiply one side by 2, multiply the other side by 2 as well. This is the only
way that the enlargement will be proportionally correct!
These
sizes work because they are all equal to 8" x 10". Basically, if you
multiply one side by 2, multiply the other side by 2 as well. This is the only
way that the enlargement will be proportionally correct!
I find that it's sometimes
easier to keep track of where I am amongst all those little squares by marking
them numerically and alphabetically along the edges of the paper and canvas.

So now your task is to
transfer what you see in the reference photo, block by block, onto your paper.
 As you
are transferring the image, you are only paying attention to one block at a
time. Don't worry about the other blocks - just focus on that one block.
As you
are transferring the image, you are only paying attention to one block at a
time. Don't worry about the other blocks - just focus on that one block. 
Continue
on in this manner, until all the squares are done and the image is completely
transferred. By focusing on one square at a time, you end up drawing what you
actually see, and not what you think you see or even what you
think you ought to see. Once finished, you now have a pretty
accurate rendition of your reference photo, ready for shading and value!
Your task:
1. Choose a photo
online of a still life. This still life object needs to represent or symbolize a FEAR or DREAM you have. Make sure your photo has a good variety of values and a
strong light source. Also, you must choose
a PHOTO, not a drawing! If you would
like to challenge yourself, you may choose to draw a person. Email your photo to me so that I can print it
at 5" x 7". deandra.mercer@granderie.ca.
2. Following the steps
in this handout, grid your photo.
3. Create a larger grid of 10" x 14" for your transferred drawing.
4. Going square by square, transfer your image to the larger grid.
5. Erase your grid lines in the new drawing. Shade your drawing with a good range of values, focusing on contrast.
Success criteria:
- I have successfully used the grid to create a larger scale value drawing that:
- ü has correct proportions
- ü accurate drawing
- ü a full range of values
- ü shows high contrast
- ü demonstrates care and effort
Reflection Questions : Answer the following in complete sentences. /10
1. What is Value?
2. Would you consider your piece high key value or low key value? Explain why.
3. What have you done very successfully in this art piece?
4. How does the content reflect your fears or dreams?
5. What other element of art is present in your art piece?
This comment has been removed by a blog administrator.
ReplyDelete